
How to Create A Blog Post in Wix
- Sep 25, 2023
- 4 min read
Updated: Jan 22
Wix’s blogging app is fairly straightforward, making it easy for you to add updates to your website. Follow these steps to create a successful post.
Accessing the Blog
You can access the blog via the left hand menu on your Home screen after logging in to your Wix account:

Then click “Create New Post” in the upper right corner:

OR:
You can also access the blog via the Wix editor. From the home screen, click the “Edit Site” button in the upper right hand corner:

Then click the “My Business” link in the left hand menu (an icon of two boxes and half a gear):

Then click “Wix Blog”

Click “Create Post”

Either of the methods described above will open the blog post composer screen:
Adding Your Blog Post Content
Now you’re ready to put together your blog post.
Enter a Title. Try to make it descriptive and include at least one relevant keyword.
Enter your post text. To format your text, select the text and use the menu that appears at the top of the screen:

Example: formatting Header text Select the heading you want from the drop down menu.

Adding images & other elements:
Click on the screen where you want your image/element to go, then click the plus sign that shows up to the left of your cursor, or the “Add” button in the left hand menu.

The Add menu appears on the left:

The Add menu offers options to add images, an image gallery, video, gifs, files, buttons, etc. Feel free to explore all of these buttons, but for now we’ll add an image.
Click the "Image" icon (top left in the Add menu).
Select an image from your existing site files, or click the “Upload Media” button in the upper left corner to upload a new image.

With the image you want selected, click “Add to Page” in the lower right corner:

You will see a menu above your inserted image. (You can get that menu any time by clicking the image to select it.) Use this menu to change the image’s size and alignment, edit the image, add links, and more. Hover over the buttons for tooltips that will tell you what each button does.

One thing you will want to do is add “alt text” to your image so search engines and people using screen readers know what’s in the image.
Click the "Settings" link:

Enter your caption (optional) and Alt text (highly recommended)

Click "Save" in the lower right hand corner of the screen.
Continue to add text and elements as desired. You can click and drag elements to move them. When you have everything the way you want, you can click the "Preview" button in the upper right hand corner to see what the blog post will look like before you publish it:
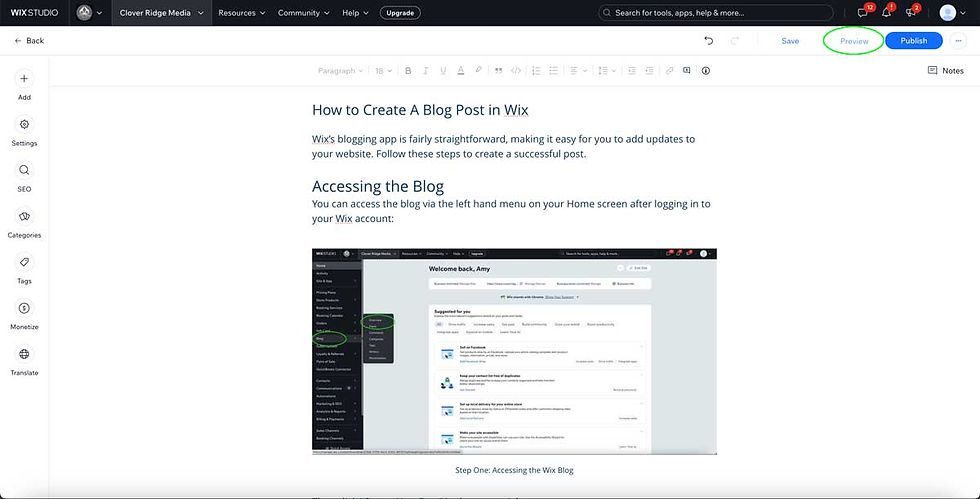
When you’re done previewing the post, click "Back to Editing” in the upper right corner to return to the composer:

Settings & SEO
Before you publish your post, be sure to review your settings!
Click "Settings" in the left hand menu:

Wix will automatically set the first image in your post as the featured image. If you want to change it, hover over the image and click “Update”
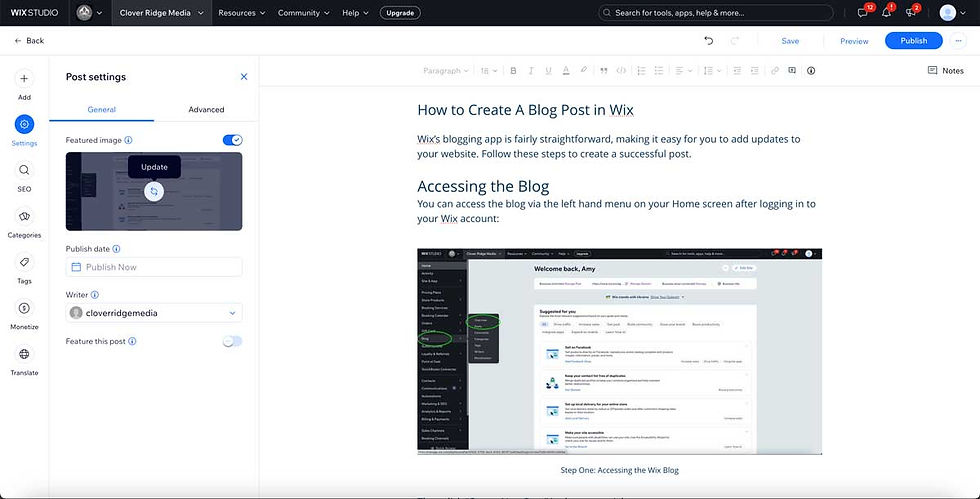
Select a publish date if desired. You can change the publish date at any time to reorder posts in your blog. (Newest posts will display on top.)
Select the writer (as needed/desired) from the dropdown menu.
If you want to make this post “featured” you can click the toggle switch.
Next, click the “Advanced” tab:

Enter an Excerpt – up to 140 characters. This is what users will see in a link preview on social media. It also helps tell search engines what your blog post is about.
On this panel you can also select related posts (posts you may want to point people to read next, for example) and you can allow or disable comments with the toggle switch.
Next, click “SEO” in the right hand menu:

The “Assistant” panel will walk you through the essentials and point out anything you may have missed.
Enter a focus keyword and click "Save."
Scroll through the task list and address any issues marked with a red icon. These tasks could include adding any alt text to images that you may have missed and making sure your headings and descriptions include your focus keyword. (This isn’t always possible, but it’s recommended as a best practice.)
Next, click the “Basics” tab:

Review your preview, URL slug (the web address for the post – use your focus keywords when possible) and enter a Meta Description that will tell search engines what’s in your post.
Next, click the “Social share” tab and review the settings there and make changes as desired.
You can set Categories for your blog post, which will allow users to view all posts in a particular category and allow you to set up pages with just the posts from a specific category. (Ask Amy for help if you need it!)

If desired, you can also add Tags to your post to help readers sort and find the posts they’re looking for.

Now you’re ready to publish your post! Simply click the “Publish” button in the upper right hand corner and your post will be available for the world to see.
If you have any questions or need additional help, reach out to Amy Crawford at amy@cloverridgemedia.com
Happy Blogging!
Comments